На этой страницы я собрал список плагинов, которые могут представлять интерес для использования на ваших сайтах. Собственно, любой плагин WordPress может представлять интерес, но эти я сам использую и они мне нравятся, а также имеют большое количество активных установок.
Удобство работы и администрирования сайта
Classic Editor — позволяет вернуть классический редактор при создании публикаций вместо новомодного редактора блоков.
Revision Control — как известно, при обновлении публикации, WordPress сохраняет предыдущую редакцию как ревизию, которую с помощью данного плагина можно вернуть обратно. А также можно удалить все старые версии публикации и таким образом почистить базу от ненужных дублей.
TinyMCE Advanced — позволяет заменить ограниченный набор функций классического редактора на расширенный визуальный редактор TinyMCE.
WP Super Cache — наиболее популярный плагин кэширования публикаций.
User Role Editor — редактор прав пользователей для конкретных ролей. Вы можете изменить предустановленные права работы с WordPress для стандартных ролей, а также создать собственные роли с необходимыми вам правами.
Разработка
Simple Custom CSS and JS — плагин, позволяющий добавить произвольный CSS и/или JavaScript на ваш сайт. Очень удобно, если нужно поправить стили темы оформления, а она не содержит возможности указывать дополнительные стили и JavaScript.
Безопасность
WP Cerber Security — шикарный плагин, позволяющий повысить безопасность вашего сайта, заблокировав перебор паролей или даже вообще предоставить доступ в админку только по белому списку. Там же вы найдёте проверку файлов сайта по высчитанным ранее контрольным суммам и некоторые другие фичи.
Капча — позволяет вставить CAPTCHA (ввод кода с картинки) на страницы входа, регистрации и добавления комментариев.
Содержимое
Advanced Custom Fields — Самый популярный плагин для добавления дополнительных полей к публикациям. Часто стандартных полей (заголовок, тело публикации, категория, тег) недостаточно. Нужны и другие поля, например для характеристик товара или описания книги.
bbPress — позволяет создать на сайте форум. К сожалению, не все темы оформления нормально поддерживают работу форума. Поэтому надо либо искать соответствующую тему, либо писать к текущей теме оформления шаблоны/стили для отображения форума самостоятельно.
Breadcrumb NavXT — позволяет добавить в публикации цепочку навигации (хлебные крошки). К сожалению, только через правку шаблона публикации.
Compact Audio Player — позволяет добавить в публикации шорткод проигрывателя .mp3 или .ogg файлов. Не требует никаких дополнительных библиотек.
Custom Permalinks — позволяет задать произвольный URL для вашей публикации. По умолчанию WordPress предлагает очень ограниченный выбор автоматической генерации URL публикации. Используя данный плагин вы можете указать совершенно произвольный URL, неограниченный никакими шаблонами.
Custom Post Type UI — позволяет создавать кастомные типы публикаций и дополнительные кастомные таксономии. Используя данный плагин, вы можете добавить, например, ещё одну таксономию для категоризации, если одной вам недостаточно.
Cyr-To-Lat — плагин позволяет выполнить транслитерацию русскоязычного URL в латиницу, что повышает его читабельность и сокращает размер URL.
DrawIt (draw.io) — позволяет вставлять в публикации схемы и диаграммы, созданные на сайте http://draw.io в режиме онлайн. После вставки сохраняется возможность редактирования.
Easy Table of Contents — Добавляет удобный и полностью автоматический способ создания и отображения оглавления, созданного из содержимого страницы.
Easy Watermark — позволяет добавлять к загружаемым изображениям заданный текст или картинку. Полезно для маркировки ваших изображений, которые вы выкладываете на сайт авторскими отметками, например URL вашего сайта или указание копирайта и ФИО автора.
Google XML Sitemaps — пожалуй лучший плагин для генерации sitemap файлов в автоматическом режиме.
Kama WP Smiles — добавляет возможности использовать смайлики в публикации и комментарии.
OSM — добавляет возможность вставить фрагмент карты Open Streetmap в публикацию с указанием одного или нескольких маркеров объектов на карте. Не требует API ключей в отличие от Yandex Map или Google Map.
Page-list — плагин, предоставляющий шорткоды, которые выводят список заголовков дочерних или соседних страниц от текущей. Регулируется глубина обхода иерархии.
PHP Code Widget — включение возможности использовать вставки PHP кода в виджеты.
Relevanssi — на сегодняшний день, самый удобный поиск по сайту для русского языка. Морфологию и синонимы не понимает, но умеет искать по частям слов.
WP ULike — позволяет настроить голосование рейтинга публикации в виде звёздочек или лайков. Также работает и с комментариями.
WP User Avatar — Используйте любое изображение из вашей медиа библиотеки WordPress, как пользовательский аватар. Добавьте свой собственный стандартный аватар
Шорткоды — обширная коллекция шорткодов с разной функциональностью.
(перевод Theme Handbook с сокращениями, оставим только суть)
Добро пожаловать. Данная книга предназначена как для новичков, так и для опытных разработчиков, и содержит подробную информацию по всем аспектам разработки тем оформления в WordPress.
Если вы уже прошли вводный раздел, то раздел Основы темы оформления поможет вам разобраться в создании блоков темы оформления WordPress.
Раздел Функционал тем оформления расскажет вам о разных типах функционала, который вы можете использовать в вашей теме оформления.
Если вы хотите получить гибкость и защитить ваших пользователей, изучите разделы Кастомизация и Безопасность
Если вы знакомы с основами тем оформления, прочтите Расширенные возможности тем оформления, чтобы узнать о дочерних темах, лучших практиках пользовательских интерфейсов, тестировании тем и многом другом.
Если вы готовы поделиться своей темой оформления со всем миром, то в заключительном разделе вы узнаете как выпустить вашу тему оформления, научитесь лучшим практикам распространения тем оформления и подготовке их к размещению в каталоге тем на WordPress.org.
Данная книга создана сообществом WordPress для сообщества WordPress. Мы всегда ищем новых авторов; если вам это интересно, загляните в блог команды документирования, чтобы узнать о том как стать участником.
Первые шаги
Вы готовы начать разработку тем оформления WordPress? Вы нашли верное место.
В данном разделе, вы прочтёте о том, что такое темы оформления WordPress и как они работают. Затем, обсудим лицензию GPL, которая является лицензий, используемой WordPress и всеми темами в каталоге WordPress.
Затем вы узнаете о некоторых инструментах, которые понадобятся вам при разработке тем оформления WordPress, а также о том как настроить локальную среду для разработки.
Данная книга может научить вас основам разработки тем оформления WordPress. Вы должны прочитать данную книгу в случае если вы:
разрабатываете дочернюю тему, предназначенную для работы с родительской;
создаёте новую тему, на основе существующей;
хотите понять основы той работы, которая происходит внутри темы;
разрабатываете тему, основанную на вашем воображении;
Требуемый уровень
Чтобы извлечь максимальную пользу из этого руководства, вы должны иметь представление и опыт работы с веб-технологиями, такими как HTML, CSS и PHP.Вы также должны уметь устанавливать и настраивать веб-сайты с помощью WordPress.
Примечание. Понимание того, как работают базы данных MySQL, а также серверные технологии в целом, полезно, но не является обязательным условием для разработки тем оформления WordPress.Аналогично, хотя знание JavaScript может быть полезным, это не обязательно.
О чём рассказывает эта книга
Это руководство содержит основную информацию, необходимую для разработки тем оформления WordPress, включая подробное описание основных тегов и функций шаблона.
WordPress — обширная тема.Охват каждого возможного тега, функции и сценария выходит за рамки данного руководства.Если вам нужна помощь с конкретными функциями, вы можете найти эту информацию в справочнике по коду.
Цель данного руководства — дать вам прочную основу для разработки тем оформления WordPress, предоставить пошаговые инструкции по созданию базовых тем, а также предоставить советы и ресурсы, полезные для развития ваших навыков.
Что такое тема оформления?
Тема офрмления WordPress меняет дизайн вашего сайта, включая (и довольно часто) вёрстку.Изменение темы меняет внешний вид вашего сайта в интерфейсе, то есть то, что видит посетитель, когда он просматривает ваш сайт в Интернете.В каталоге тем WordPress.org есть тысячи бесплатных тем WordPress, хотя многие сайты WordPress используют собственные темы.
Что может делать тема оформления?
Темы оформления получают контент и данные, которые хранит WordPress, и отображают их в браузере.Когда вы создаете тему WordPress, вы решаете, как этот контент будет выглядеть и отображаться.Для создаваемой вами темы, доступно множество возможностей.Например:
Ваша тема может иметь разные макеты, такие как статические или адапливные, использовать одну колонку или две.
Ваша тема может отображать контент везде, где вы хотите, чтобы он отображался.
Ваша тема может задать, какие устройства или действия делают ваш контент видимым.
Ваша тема может настроить элементы оформления с помощью CSS.
Другие элементы дизайна, такие как изображения и видео, могут быть включены в любое место вашей темы.
Темы оформления WordPress невероятно мощные.Но, как и в любом проекте веб-дизайна, тема — это больше, чем цвет и макет.Хорошие темы улучшают взаимодействие с контентом вашего веб-сайта в дополнение к тому, чтобы быть красивыми.
Как сделана тема оформления?
На самом базовом уровне темы оформления WordPress представляют собой наборы различных файлов, которые работают вместе для создания того, что вы видите, а также поведения вашего сайта.
Требуемые файлы
Для темы оформления в WordPress строго необходимы только два файла:
index.php – основной файл шаблона
style.css – основной файл стилей
Не требуются, но могут быть дополнительно использованы в каталоге с темой такие файлы как:
плагин используется для управления поведением и возможностями сайта WordPress.
Любая тема, которую вы создаёте не должна предоставлять критическую для работы сайты функциональность. Такое будет означать, что если пользователь изменит свою тему оформления, он потеряет доступ к этой функциональности.Например, скажем, вы создаете тему с функцией портфолио.Пользователи, которые строят свое портфолио с помощью вашей функции, потеряют его при смене темы.
Перемещая критически важные функции в плагины, вы позволяете изменить дизайн своего веб-сайта, в то время как функциональность остается той же.
Примечание. Помните, что некоторые пользователи часто переключают темы.Лучше всего убедиться, что все функции, которые требуются вашему сайту, находятся в отдельном плагине.
Чтобы разрабатывать публичные темы оформления платные или бесплатные, вам необходимо ознакомится с лицензией GNU General Public License (сокращённо GPL), которую использует WordPress.
Основные свободы, которые предоставляет GPL
Дух открытости и желания делиться наработками процветает в сообществе WordPress благодаря фундаментальным принципам, которые описаны в его лицензии.Один из способов получить представление о GPL — это считать её неким аналогом «Билля о правах» для программного обеспечения.GPL устанавливает следующие четыре свободы:
Свобода запускать программу для любых целей.
Свобода изучать, как работает программа, и изменять ее, чтобы она делала то, что вы хотите.
Свобода распространять копии, чтобы вы могли помочь другим.
Свобода распространять копии изменённой вами программы, что дает сообществу возможность воспользоваться вашими изменениями.
Что есть “free” в контексте программного обеспечения?
Слово ‘free’ применительно к программному обеспечению, указывает на свободу и на бесплатность. Фонд «The Free Software Foundation» любит говорить “free as in speech, not as in beer.” («Бесплатно как слова, а не как пиво»). Свободное программное обеспечение — это то, которое может использоваться так, как вы хотите. Это не означает, что оно бесплатно, хотя это так для каталога тем оформления на сайте WordPress.org.
Свободное программное обеспечение может иметь цену.Другими словами, вы можете создать тему под лицензией GPL и продать ее за 50 долларов, и все равно это будет свободное программное обеспечение.Почему?Поскольку пользователь может свободно запускать, модифицировать и распространять программное обеспечение или любые модификации этого программного обеспечения.
Оставляя свободным для всех…
Свободы лицензии GPL не только применяются к оригинальной части программного обеспечения; работы, являющиеся производными от программного обеспечения под лицензией GPL также должны распространяться под этой же лицензией, без ограничений и дополнительных условий.
В этом смысле, GPL предоставляет неограниченную защиту свободы программного обеспечения, давая уверенность, что любые производные от свободного программного обеспечения работы не могут быть «заблокированы» (закрыты); что должно оставить программное обеспечение свободным навсегда для будущих экспериментов и исследований.
Нужно ли лицензировать мои темы оформления под GPL?
Нет, если вы не планируете распространять вашу тему оформления каким-либо способом. В случае вашего индивидуального использования, вы можете не лицензировать ваши темы под GPL.
Если вы хотите отправить свое творение в бесплатный репозиторий тем на WordPress.org, то оно должно быть на 100% совместимо с GPL, включая CSS и файлы изображений.Поскольку свободы, изложенные в GPL, лежат в основе WordPress, мы призываем разработчиков распространять свои темы со 100% GPL-совместимой лицензией.
Примечание. Свобода является важной частью разработки тем WordPress.Если вы планируете распространять свою тему, рекомендуется полностью лицензировать ее под лицензией GPL, чтобы другие могли пользоваться теми же свободами, которые вы получили при ее создании.
Дополнительно можно почитать
Чтобы глубже понять WordPress и GPL вы можете почитать:
При разработке тем лучше всего делать это в среде, идентичной продуктивному серверу, на который в конечном итоге будет установлен WordPress.Ваша среда разработки может быть локальной или удаленной.Настройка локальной среды для работы над темой WordPress полезна по нескольким причинам:
Вы cможете создать свою тему локально, не полагаясь на удаленный сервер.Это ускоряет процесс разработки и позволяет мгновенно видеть изменения в вашем браузере.
Вам не нужно подключение к Интернету, чтобы создать свою тему.
Вы можете проверить свою тему с разных точек зрения.Это важно, особенно если вы планируете сделать свою тему для более широкой аудитории и хотите обеспечить максимальную совместимость
Ваша локальня среда разработки WordPress
Для разработки тем WordPress вам необходимо настроить среду разработки, подходящую для WordPress.Для начала вам понадобится стек локального сервера и текстовый редактор.Есть несколько вариантов, в том числе:
Стек локального сервера
LAMP (Linux Apache MySQL/MariaDB PHP) или WAMP (Windows Apache MySQL/MariaDB PHP) — это сервер (похожий на ваш веб-сервер), который вы настроите на вашей локальной машине. Для быстрого старта, вы можете установить предварительно подготовленные стеки MAMP (для Mac), или XAMPP (Mac или Windows).
Виртуализованная среда
Такая виртуализация, созданная с помощью Vagrant и VirtualBox, позволяет создавать легко воспроизводимые среды разработки.Varying Vagrant Vagrants (VVV) — это популярный вариант Vagrant, который создает среду разработки WordPress.
Текстовый редактор
В дополнение к среде локального сервера вам также понадобится текстовый редактор для написания кода.Ваш выбор текстового редактора является личным, но помните, что хороший текстовый редактор может ускорить процесс разработки.Ваш текстовый редактор может быть чем угодно, от базового инструмента для написания кода до полностью интегрированной среды разработки (IDE) с инструментами для отладки и тестирования. Некоторые даже включают поддержку разработки WordPress.Популярные варианты: Atom, Sublime Text и PhpStorm.
Для тем WordPress является стандартной практикой поддержка на как минимум две версии назад для обеспечения минимальной обратной совместимости.Например, если текущая версия WordPress имеет версию 4.6, вам также следует убедиться, что ваша тема также хорошо работает в версиях 4.5 и 4.4.
Вы можете обратиться к странице дорожной карты WordPress для доступа к более старым версиям WordPress.Затем вы можете загрузить и установить более старые версии WordPress, создав для тестирования несколько сайтов разработки, на каждом из которых для будут использоваться разные версии WordPress.
WP_DEBUG
Настройка отладки является неотъемлемой частью разработки темы WordPress.WordPress предоставляет ряд констант для поддержки ваших усилий по отладке. Они включают:
WP_DEBUG
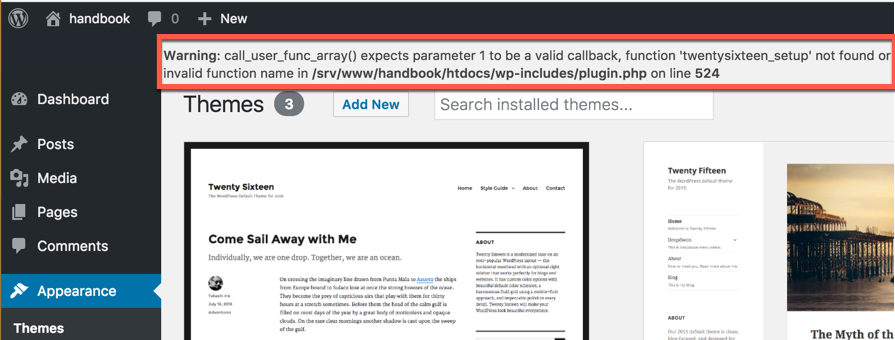
Константа PHP WP_DEBUG используется для запуска встроенного режима «отладки» в вашем WordPress.Это позволяет просматривать ошибки в теме оформления.Чтобы включить:
1. Откройте файл wp-config.php
2. Измените:
1
define( 'WP_DEBUG', false );
на
1
define( 'WP_DEBUG', true );
Примечание. Несмотря на то, что в файле wp-config.php обычно установлено значение «false», для рабочих копий WordPress — альфа- и бета-версий следующего выпуска — WP_DEBUG по умолчанию уже установлено значение «true».
WP_DEBUG_DISPLAY и WP_DEBUG_LOG
WP_DEBUG_LOG и WP_DEBUG_DISPLAY являются дополнительным константами PHP, которые расширяют поведение при включенном WP_DEBUG.
WP_DEBUG_LOG используется вместе с WP_DEBUG для записи всех сообщений об ошибках в debug.log в вашем каталоге WordPress / wp-content /.Чтобы включить эту функцию, установите для WP_DEBUG_LOG значение true в вашем файле wp-config.php.
1
define( 'WP_DEBUG_LOG', true );
WP_DEBUG_DISPLAY используется для управления отображением сообщений отладки в HTML на страницах вашей темы.Чтобы сообщения об ошибках отображались по мере их появления, настройте для этого параметра значение «true» в файле wp-config.php
1
define( 'WP_DEBUG_DISPLAY', true );
Если включены WP_DEBUG и WP_DEBUG_DISPLAY, сообщения об ошибках будут отображаться в верхней части страниц вашего сайта.
Примечание. Ошибки будут отображаться во внешней и административной областях вашего сайта. Эти средства отладки предназначены для локального тестирования и промежуточной установки, а не для живых сайтов.
Другие инструменты разработчика WordPress
В дополнение к WP_DEBUG, следующие плагины и наборы данных модульного тестирования являются важной частью вашего набора инструментов разработки и помогают вам разрабатывать лучшие темы WordPress.
Тестовые данные
Тестовые данные элментов темы WordPress.org
WordPress.org Theme Unit Test Data — это XML-файл, содержащий фиктивные тестовые данные, которые вы можете загрузить, чтобы проверить, как темы работают с различными типами и макетами контента.
Тестовые данные элментов темы WordPress.com
WordPress.com Theme Unit Test Data — это фиктивные тестовые данные, которые вы можете загрузить в установку WordPress для тестирования вашей темы, включая специфические для WordPress.com функции.
Плагины
Debug Bar(плагин WordPress)
Debug Bar добавляет админскую панель в интерфейс администратора WordPress, предоставляя централизованный инструмент для отладки.
Query Monitor(плагин WordPress)
Query Monitor позволяет отлаживать запросы к базе данных, запросы к API и AJAX, вызываемые для генерации страниц темы и функционала темы.
Log Deprecated Notices(плагин WordPress)
Log Deprecated Notices журналирует некорректное использования функций и использование устаревший файлов и функций в вашей теме WordPress.
Monster Widgets(плагин WordPress)
Monster Widget косолидирует базовые виджеты WordPress в единый виджет, позволяя вам тестировать функциональность стилей виджетов в вашей теме.
Developer (плагин WordPress)
Developer помогает оптимизировать вашу среду разработки, позволяя лёгкую установку инструментов и плагинов, которые помогают в решении проблем и проверке качества кода.
Theme-Check (плагин WordPress)
Theme-Check тестирует вашу тему на соответствие последним стандартам WordPress и лучшим практикам.
Руководство по обзору тем оформления WordPress
В дополнение к вышеперечисленным инструментам разработки, неплохо бы быть в курсе руководящих принципов команды по обзору тем WordPress.org для представления тем и рекомендаций по соблюдению стандартов кодирования WordPress.Эти рекомендации являются «золотым стандартом» для качественной разработки тем и полезны, даже если вы не планируете выпускать тему на WordPress.org для обещственности.
Один из лучших способов понять стандарты кодирования тем — найти примеры других тем, которые были написаны с учетом этих стандартов.
Default “Twenty” themes
Упакованные в каждую версию WordPress начиная с версии 3.0 (и названную в честь года, в котором они были выпущены), темы по умолчанию являются одними из лучших для изучения того, как они создаются.Это потому, что они разработаны с учетом широкого использования и полностью соответствуют стандартам кодирования WordPress.Вы можете скачать и изучить файлы этих тем, а также использовать их в качестве примеров для ознакомления при обучении разработке собственных тем:
В отличие от стандартных тем «Двадцатых», тема _s (или Underscores) предназначена для разработчиков, а не для конечных пользователей.Он предназначен для начальной темы оформления, которую вы можете использовать в качестве основы для ускорения своего развития.Она имеет ряд особенностей:
Хорошо прокомментированные шаблоны HTML5, включая шаблоны ошибок.
Простая кастомная реализация заголовка в inc/custom-header.php.
Простые теги шаблона в inc/template-tags чтобы шаблоны оставались организованными и для предотвращения дупликации кода.
Скрипты для улучшения навигации с клавиатурой—найдены в js/keyboard-image-navigation.js—а также навигация по маленькому экрану в js/navigation.js.
Пять примеров CSS макетов в /layouts а также стартовый CSS на которых вы можете построить ваш дизайн.
Код лицензирован под GPL.
Приведенные выше функции делают Underscores отличной темой для разработчика, желающего создать собственную тему.И даже если вы удалите дополнения, оставшаяся база — все еще отличный пример темы с хорошим кодом, разработанной с учетом стандартов и передового опыта.
Кроме того, все темы, опубликованные в каталоге тем, перед публикацией проверяются на соответствие стандартам.Изучение тем в каталоге — это отличный способ лучше понять, как работает разработка тем, и хороший способ получить вдохновение для вашей собственной темы.
Основы темы оформления
В данной главе вы начнёте учиться как разрабатывать темы оформления должным образом. Вы получите знания об анатомии темы и ее частей.Вы начнете с понимания структурных элементов темы, рассматривая файлы тем и типы публикаций.Затем вы узнаете, как сохранить ваши файлы организованными в рамках вашей темы.
Вы также рассмотрите на Цикл, который отвечает за извлечение контента из базы данных WordPress.
Файлы шаблонов используются во всех темах WordPress, но сначала давайте узнаем о терминологии.
Терминология шаблонов
Термин “шаблон” используется при работе с темами оформления WordPress в нескольких случаях:
Файлы шаблонов, существующие внутри темы и отвечающие за то как отображается сайт.
Шаблоны страниц — это те, которые применяются только к страницам, чтобы изменить их внешний вид.Шаблон страницы может быть применен к отдельной странице, разделу страницы или классу страниц.
Тэги шаблонаэто встроенные функции WordPress, которые вы можете использовать внутри файла шаблона для извлечения и отображения данных (такие как the_title() и the_content()).
Иерархия шаблона логика WordPress, используемая для того, чтобы решить, какие файлы шаблона темы использовать в зависимости от запрошенного содержимого.
Файлы шаблона
Темы WordPress состоят из файлов шаблонов. Это файлы PHP, которые содержат смесь HTML, тегов шаблонов и кода PHP.
Когда вы создаете свою тему, вы будете использовать файлы шаблонов, чтобы влиять на вёрстку и дизайн различных частей вашего сайта. Например, вы можете использовать шаблон header.php для создания заголовка или шаблон comments.php для добавления комментариев.
Когда кто-то посещает страницу на вашем сайте, WordPress загружает шаблон на основе запроса. Тип содержимого, отображаемого в файле шаблона, определяется типом публикации, связанным с файлом шаблона. Иерархия шаблонов описывает, какой файл шаблона будет загружен WordPress, в зависимости от типа запроса и наличия шаблона в теме. Затем сервер выполняет код PHP в шаблоне и возвращает HTML посетителю.
Самый важный файл шаблона — это index.php, который является универсальным шаблоном, если в иерархии шаблонов нет более конкретного шаблона. Хотя теме нужен только шаблон index.php, обычно темы включают множество шаблонов для отображения различных типов контента и контекстов.
Частичные шаблоны
Частичный шаблон — это кусок шаблона, который подключается как часть другого шаблона, например такой как шапка сайта. Частичные шаблоны могут встраиваться в несколько шаблонов, упрощая создание темы оформления. Наиболее распространённые частичные шаблоны включают:
header.php для генерации шапки сайта
footer.php для генерации подвала
sidebar.php для генерации боковой панели
Хотя приведенные выше файлы шаблонов являются особым случаем в WordPress и применяются только к одной части страницы, вы можете создать любое количество частичных шаблонов и включить их в другие файлы шаблонов.
Наиболее распространённые файлы шаблонов
Ниже дан список базовых шаблонов темы оформления и файлов, которые распознает WordPress.
index.php
Основной файл шаблона. Он обязательно должен быть во всех темах.
style.css
Основной файл со стилями. Он обязательно должен быть во всех темах и содержит информацию о вашей теме.
rtl.css
Файл стилей справа налево. Он автоматически подключается, если язык сайта имеет направление написания справа налево.
comments.php
Шаблон комментариев.
front-page.php
Шаблон главной страницы, который, если существует, всегда используется главной страницей сайта, независимо от настроек в Админка > Настройки > Чтение.
home.php
Шаблон домашней страницы по умолчанию является шаблоном главной страницы. Если вы не указали WordPress, чтобы он использовал статическую главную страницу, то данный шаблон используется для отображения последних публикаций.
header.php
Файл шаблона шапки обычно содержит тип документа вашего сайта, мета-информацию, ссылки на стили и скрипты, а также другие данные.
singular.php
Данный шаблон используется для записей, если не найден файл шаблонаsingle.php или для страниц, если не найден файл шаблона page.php. Если singular.php тоже не найден, используется файл шаблона index.php.
single.php
Шаблон вывода одиночной записи, который используется, когда посетитель сайта просматривает одиночную запись.
single-{тип-публикации}.php
Шаблон одиночной записи, который используется, когда посетитель сайта просматривает одиночную публикацию, специально указанного типа. Например, single-book.php должен быть использован для отображения одиночных публикаций специального типа book. Если шаблон одиночной публикации специального типа не существует, то будет использован файл шаблона index.php.
archive-{тип-записи}.php
Шаблон одиночной архивной публикации, который используется, когда посетитель сайта просматривает одиночную архивную публикацию, специально указанного типа. Например, archive-books.phpдолжен быть использован для отображения одиночных архивных публикаций специального типа book. Если шаблонarchive-{post-type}.php не существует, то будет использован файл шаблонarchive.php.
page.php
Данный шаблон используется отображения отдельных страниц, которые являются встроенным шаблоном.
page-{slug}.php
Данный шаблон используется, для отображения специально указанной страницы, например, такой как страница со слагом “about” (page-about.php).
category.php
Данный шаблон используется для просмотра публикаций в категории.
tag.php
Данный шаблон используется для просмотра публикаций по тегу.
taxonomy.php
Данный шаблон используется при просмотре терминов в кастомной таксономии.
author.php
Данный шаблон используется при просмотре страницы автора.
date.php
Шаблон даты/времени, который используется, когда публикаия запрашивает дату или время. Например, страницы сгенерированы с данными слагами:
http://example.com/blog/2014/
http://example.com/blog/2014/05/
http://example.com/blog/2014/05/26/
archive.php
Данный шаблон используется, когда посетитель сайта запрашивает записи по категории, автору или дате. Обратите внимание: данный шаблон будет перекрыт, если есть более подходящие файлы шаблонов, такие как category.php, author.phpи date.php.
search.php
Это шаблон отображения результатов поиска.
attachment.php
Этот шаблон используется для просмотра одиночных прикреплений, таких как изображение, pdf или другие медиа-файлы.
image.php
Это специальная версия шаблона attachment.php, которая используется для просмотра одиночного прикреплённого изображения. Если не существует, WordPress будет использовать файл шаблона attachment.php instea.
404.php
Данный шаблон используется, когда WordPress не может найти запись, страницу или другие публикации, которые затребовал пользователь.
Использование файлов шаблонов
Вмест с шаблонами WordPress, вы можете использовать для динамического отображения информации Теги шаблонов, включая другие файлы шаблонов или напротив кастомизируя ваш сайт.
Например, в вашем index.phpвы можете включить в итоговую генерируемую страниц другие файлы:
Файл style.css является для каждой темы WordPress файлом стилей (CSS). Он управляет представлением (внешним видом и вёрсткой) страниц сайта.
Местоположение
Чтобы WordPress распознал набор файлов шаблонов темы в качестве допустимой темы оформления, файл style.css должен находиться в корневом каталоге вашей темы, а не в подкаталоге.
Более подробное объяснение о том, как включить файл style.css в тему, см. В разделе «Таблицы стилей» в Сценариях и стилях.
Базовая структура
WordPress uses the header comment section of a style.css to display information about the theme in the Appearance (Themes) dashboard panel.
WordPress использует раздел комментариев в начале файла style.css для отображения информации о теме в при выборе пунка «Внешний вид» («Темы») в панели администратора.
Пример
Вот пример начала файла style.css.
/*
Theme Name: Twenty Seventeen
Theme URI: https://wordpress.org/themes/twentyseventeen/
Author: the WordPress team
Author URI: https://wordpress.org/
Description: Twenty Seventeen brings your site to life with immersive featured images and subtle animations. With a focus on business sites, it features multiple sections on the front page as well as widgets, navigation and social menus, a logo, and more. Personalize its asymmetrical grid with a custom color scheme and showcase your multimedia content with post formats. Our default theme for 2017 works great in many languages, for any abilities, and on any device.
Version: 1.0
License: GNU General Public License v2 or later
License URI: http://www.gnu.org/licenses/gpl-2.0.html
Text Domain: twentyseventeen
Tags: one-column, two-columns, right-sidebar, flexible-header, accessibility-ready, custom-colors, custom-header, custom-menu, custom-logo, editor-style, featured-images, footer-widgets, post-formats, rtl-language-support, sticky-post, theme-options, threaded-comments, translation-ready
This theme, like WordPress, is licensed under the GPL.
Use it to make something cool, have fun, and share what you've learned with others.
*/
Пункты отмеченные (*) являются необходимыми для темы оформления в репозитории тем WordPress.
Обратите внимание: Репозиторий тем WordPress использует номер после слова “Version” в файле, чтобы определить, доступна ли для темы более новая версия.
Theme Name (*): Имя (название) данной темы.
Theme URI: URL публичной страницы, где пользователи могут найти больше информации о данной теме.
Author (*): Имя автора или название организации разработчика темы. Рекомендуется использовать в качестве автора имя пользователя с сайта wordpress.org.
Author URI: URL автора или организации.
Description (*): Краткое описание темы.
Version (*): Версия, в формате X.X или X.X.X.
License (*): Лицензия темы.
License URI (*): URL лицензии темы.
Text Domain (*): Строка используемая в качестве textdomain при переводе.
Tags: Слова или фразы, которые позволят пользователям найти данную тему с использованием фильтра по тегам. Полный список тегов можно найти на странице Руководства по обзору тем.
Domain Path: Используется для того, чтобы WordPress знал, где найти перевод, когда тема отключена. По умолчанию/languages.
После обязательной секции с вышеперечисленными полями, style.css может содержать всё, что содержится в любом CSS файле.
Style.css для дочерней темы
Если ваша тема является дочерней, в начальной секции style.css обязательно должно присутствовать поле Template, которое содержит имя родительского шаблона.
/*
Theme Name: My Child Theme
Template: Twenty Seventeen
*/
Больше информации о создании дочерних тем можно найти на странице Дочерние темы.
Типы публикаций
В WordPress есть много разных типов контента.Эти типы контента обычно описываются как Типы Публикаций, что может немного сбивать с толку, поскольку относится ко всем различным типам контента в WordPress.Например, запись — это определенный тип публикации, как и страница.
От переводчика: Русскоязычные пользователи запутываются вдвойне. Потому что так сложилось, что слово «Post» перевели как «Запись», но «Post» это также и публикация (в зависимости от контекста, который надо ещё понять) и соответственно когда пишут «Post Types» имеется в виду «Типы публикаций», а не «Типы записей».
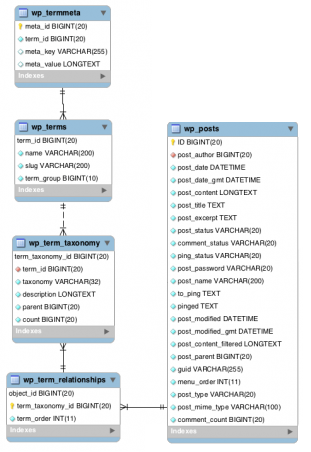
Внутри все Типы Публикаций хранятся в одном и том же месте — в таблице базы данных wp_posts — но различаются по столбцу базы данных, называемому post_type.
В дополнение к стандартным Типам Публикаций вы также можете создавать собственные Типы.
На странице Файлы шаблонов кратко упоминается, что разные Типы Публикаций отображаются в разных файлах шаблонов.Поскольку основная цель файла шаблона состоит в том, чтобы отображать контент определенным образом, цель Типов Публикаций состоит в том, чтобы классифицировать тип контента, с которым вы имеете дело.Вообще говоря, определенные Типы Публикаций связаны с определенными файлами шаблонов.
Типы публикаций по умолчанию
Существует пять Типов Публикаций по умолчанию, которые доступны пользователям и которые создаются в процессе установки WordPress:
Запись (Тип публикации: ‘post’)
Страница (Тип публикации: ‘page’)
Прикрепление (Тип публикации: ‘attachment’)
Ревизия (Тип публикации: ‘revision’)
Меню навигации (Тип публикации: ‘nav_menu_item’)
Указанные выше типы публикаций могут быть изменены и удалены с помощью какого-либо плагина или темы, но удалять встроенные функции для широко распространяемой темы или плагина не рекомендуется.
Наиболее распространенными типами публикаций, с которыми вы будете взаимодействовать как разработчик тем, являются Запись, Страница, Прикрепление и кастомные Типы Публикаций.Данное руководство выходит за рамки описания Типов Публикаций Ревизия и Меню Навигации.Тем не менее, важно отметить, что вы будете взаимодействовать и создавать функциональность разных Меню Навигации, что будет подробно описано далее в этом руководстве.
Запись
Записи используются в блогах. Они:
отображаются в обратном последовательном порядке с сортировкой по времени, начиная со самой свежей
Прикрепления обычно используются для показа изображений или других медиа-файлов в содержимом, а также могут быть использованы как ссылки для подходящих файлов. Особенности этого типа публикации:
содержит информацию (такую как имя или описание) о файлах, закаченных через систему закачки медиа
для изображений, включает информацию о метаданных, сохраняемую в таблицу wp_postmeta (включая размер, миниатюру, местоположение и т.д.)
Файлы шаблона, который отображают публикации этого типа:
Используя Кастомные Типы Публикаций вы можете создать свой собственный тип публикации.Не рекомендуется размещать эту функциональность в своей теме. Данный вид функциональности должен быть размещен / создан в плагине.Это обеспечит переносимость содержимого вашего контента, а также то, что при изменении темы содержимое, сохраненное в кастомных типах публикаций, не исчезнет.
Хотя вы, как правило, не будете разрабатывать пользовательские типы публикаций в своей теме, вы можете захотеть написать код для отображения кастомных типов публикаций, которые были созданы каким-либо плагином.Следующие шаблоны могут отображать пользовательские типы публикаций:
single-{post-type}.php
archive-{post-type}.php
search.php
index.php
Кроме того, разработчики тем могут отображать Пользовательские Типы Публикаций в любом файле шаблона, часто используя несколько циклов.
Хотя темы WordPress технически требуют только двух файлов (index.php и style.css), они обычно состоят из множества файлов.Это означает, что они могут быстро дезорганизоваться!Этот раздел покажет вам, как сохранить ваши файлы организованными.
Примечание. Темы без header.php и footer.php, несомненно устарели с WordPress 3.0.Вашей теме также могут понадобится эти файлы.
Каталог темы и файловая структура
As mentioned previously, the default Twenty themes are some of the best examples of good theme development. For instance, here is how the Twenty Seventeen Theme organizes its file structure:
Как упоминалось ранее, темы Twenty по умолчанию являются одними из лучших примеров хорошей разработки тем.Например, вот как тема Двадцать Семнадцать организована файловая структура:
Видно, что файлы основного шаблона темы находятся в корневом каталоге, тогда как JavaScript, CSS, изображения помещаются в каталог ресурсов assets, части шаблона размещаются в соответствующем подкаталоге частей шаблона template-parts, а набор функций, связанных с основными функциями, размещаетсяв каталоге inc.
В настоящее время, никаких подкаталогов веутри каталога темы WordPress не требуется.Однако WordPress по умолчанию распознает вышеупомянутые подкаталоги.
Обратите внимание: Файлstyle.css должен находиться в корневом каталоге темы, а не внутри подкаталога CSS.
Подкаталог languages
Рекомендуется интернационализировать вашу тему, чтобы она могла быть переведена на другие языки.Темы по умолчанию включают подкаталог languages, который содержит файл .pot для перевода и уже имеющиеся файлы с переводоами с раширением .mo.Хотя languages является именем по умолчанию для этого подкаталога, вы можете его изменить.Если вы это сделаете, вы должны обновить load_theme_textdomain ().
Иерархия шаблона
Как уже говорилось, файлы шаблонов — это модульные, многократно используемые файлы, для генерации веб-страниц на вашем сайте WordPress.Некоторые файлы шаблонов (например, шаблон шапки и шаблон подвала) используются на всех страницах вашего сайта, в то время как другие используются только при определенных условиях.
В этой статье объясняется, как WordPress определяет, какие файлы шаблонов использовать на отдельных страницах.Если вы хотите кастомизировать существующую тему WordPress, это поможет вам решить, какой файл шаблона нужно отредактировать.
Совет: Для управления какие шаблоны будут загружены на отдельных страницах, вы можете также использовать Теги условий.
Файловая иерархия шаблона
Обзор
WordPress использует строку запроса, чтобы решить, какой шаблон или набор шаблонов следует использовать для отображения страницы.Строка запроса — это информация, которая содержится в ссылке на каждую часть вашего сайта.Она идет после начального знака вопроса и может содержать ряд параметров, разделенных амперсандами.
Проще говоря, WordPress просматривает иерархию шаблонов, пока не найдет соответствующий файл шаблона.Чтобы определить, какой файл шаблона использовать, WordPresss:
Сопоставляет каждую строку запроса с типом запроса, чтобы решить, какая страница запрашивается (например, страница поиска, страница категории и т. Д.);
Выбирает шаблон в порядке, определенном иерархией шаблонов;
Ищет файлы шаблонов с конкретными именами в каталоге текущей темы и использует первый соответствующий файл шаблона, как указано в иерархии.
За исключением базового файла шаблона index.php вы можете выбрать, хотите ли вы реализовать конкретный файл шаблона или нет.
Если WordPress не может найти файл шаблона с соответствующим именем, он перейдет к следующему файлу в иерархии.Если WordPress не может найти подходящий файл шаблона, будет использован файл index.php темы.
Примеры
Если ваш блог, это например, http://example.com/blog/ и посетитель сайта кликает на ссылку страницы категорий, такую как http://example.com/blog/category/your-cat/, WordPress ищет для правильной генерации страницы, файл шаблона в текущем каталоге темы, который совпадает с ID категории. Если по шагам, то WordPress следует вот такой процедуре:
Ищет файл шаблона в каталоге текущей темы, соответствующий слагу категории.Если, например, слаг категории это «unicorns», то WordPress ищет файл шаблона с именеcategory-unicorns.php.
Если файл category-unicorns.php отсутствует, а ID категории равен 4, WordPress ищет файл шаблона с именем category-4.php.
Если файл category-4.php отсутствует, WordPress ищет файл общего шаблона для категорий category.php.
Если файл category.php не существует, WordPress будет искать файл общего шаблона архивных публикаций archive.php.
Если файл archive.php также отсутствует, WordPress вернётся к главному файлу шаблона темы index.php.
Наглядный обзор
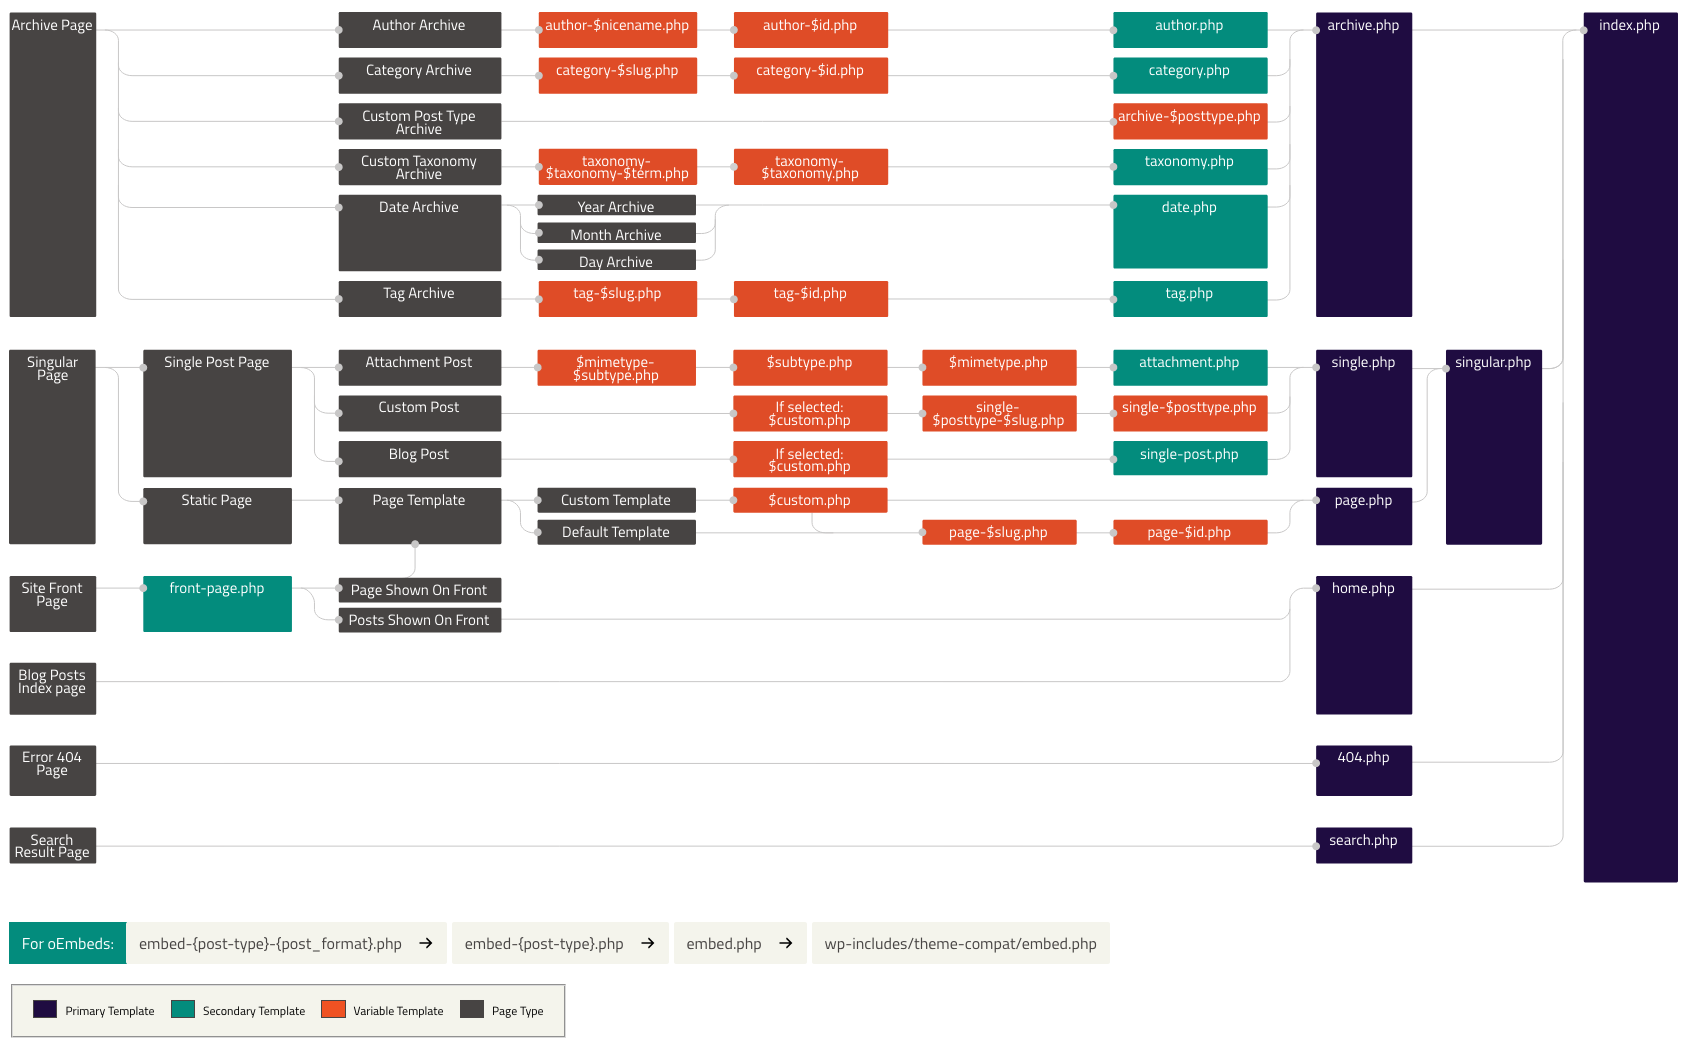
На следующей диаграмме показано, какие файлы шаблонов вызываются для создания страницы WordPress на основе иерархии шаблонов WordPress.
Хотя иерархию шаблонов легче понять в виде диаграммы, далее описывается порядок, в котором файлы шаблонов вызываются WordPress для ряда типов запросов.
Отображение Домашней Страницы
По умолчанию, WordPress устанавливает домашнюю страницу вашего сайта для отображения последних сообщений в блоге.Эта страница называется индексом публикаций блога.Вы также можете настроить отображение сообщений в своем блоге на отдельной статической странице. Для отображения индекса публикаций блога используется файл шаблона home.php, независимо от того, используется ли он в качестве главной страницы или на отдельной статической странице.Если файл home.php не существует, WordPress будет использовать index.php.
home.php
index.php
Обратите внимание: если файл front-page.php существует, он будет перекрывать шаблон home.php.
Отображение Главной Страницы
Файл шаблона front-page.php используется для отображения главной страницы вашего сайта, независимо от того, отображается ли на главной странице индекс публикаций в блоге (упомянутый выше) или статическая страница.Шаблон главной страницы имеет приоритет над шаблоном индекса публикаций в блоге (home.php).Если файл front-page.php не существует, WordPress будет использовать файлы home.php или page.php в зависимости от настроек в меню «Настройки» → «Чтение».Если ни один из этих файлов не существует, он будет использовать файл index.php.
front-page.php – используется как для значения “ваши последние записи” так и для значения “статическая страница” настройки главная страница отображает в разделе Настройки → Чтение.
home.php – Если WordPress не находит front-page.php и для настройки главная страница отображает установлено значение “ваши последние записи”, то он ищет файл шаблона home.php. В дополенение, WordPress будет искать этот файл, если в настройке отображение индекса сообщений блога установлено значение страница записей.
page.php – если в настройке главная страница отображает установлено значение “главная страница”.
index.php – если в настройке главная страница отображает установлено значение “ваши последние записи” , но файл шаблона home.php не существует или если установлено значение главная страница, но файл шбалона page.php не существует.
Как видите, существует множество правил, которым следует WordPress.Использование диаграммы выше — лучший способ определить, что будет отображать WordPress в каждом конкретном случае.
Отображение страницы Политики Конфиденциальности
Файл шаблонп privacy-policy.php используется для генерации страницы Политика Конфиденциальности на вашем сайте. Шаблона страницы Политики Конфиденциальности имеет приоритет перед шаблоном статических страниц (page.php) . Если файл privacy-policy.php не существует, WordPress будет использовать или файл шаблона page.php или файл шаблона singular.php в зависимости от их доступности. Если ни один из них не существует, то будет использван файл index.php.
privacy-policy.php – Используется для страницы Политики Конфиденциальности, установленной в настройке Выберите вашу страницу политики конфиндециальности в разделе Настройки → Конфиденциальность.
custom template file – шаблон страницы назначаемый для данной страницы. См. get_page_templates().
page-{slug}.php – Если слаг страницы имеет значение privacy, WordPress будет использовать файл шаблона page-privacy.php.
page-{id}.php – Если ID страницы равен 6, WordPress будет спользовать файл шаблона page-6.php.
page.php
singular.php
index.php
Одиночная запись
Шаблон одиночной записи используется для отображения одиночной записи блога.WordPress использует следующий путь:
single-{post-type}-{slug}.php – (начиная с версии 4.4) Сперва, WordPress ищет шаблон для конкретной публикации. Например, если тип публикации post type это product и слаг публикации это dmc-12, WordPress будет искать шаблон single-product-dmc-12.php.
single-{post-type}.php – Если тип публикации это product, WordPress будет искать шаблон single-product.php.
single.php – Затем, если вышеописанное не найдено, WordPress ищет single.php.
singular.php – Затем, если вышеописанное не найдено, ищет singular.php.
index.php – И наконец, если ничего из вышеописанного не найдено, WordPress переходит к index.php.
Одиночная страница
The template file used to render a static page (page post-type). Note that unlike other post-types, page is special to WordPress and uses the following path:
taxonomy-{taxonomy}-{term}.php – If the taxonomy is sometax, and taxonomy’s term is someterm, WordPress will look for taxonomy-sometax-someterm.php. In the case of post formats, the taxonomy is ‘post_format’ and the terms are ‘post-format-{format}. i.e. taxonomy-post_format-post-format-link.php for the link post format.
taxonomy-{taxonomy}.php – If the taxonomy were sometax, WordPress would look for taxonomy-sometax.php.
taxonomy.php
archive.php
index.php
Кастомные типы публикаций
Custom Post Types use the following path to render the appropriate archive index page.
archive-{post_type}.php – If the post type is product, WordPress will look for archive-product.php.
archive.php
index.php
(For rendering a single post type template, refer to the single post display section above.)
Экран автора
Based on the above examples, rendering author archive index pages is fairly explanatory:
author-{nicename}.php – If the author’s nice name is matt, WordPress will look for author-matt.php.
author-{id}.php – If the author’s ID were 6, WordPress will look for author-6.php.
author.php
archive.php
index.php
Дата
Date-based archive index pages are rendered as you would expect:
date.php
archive.php
index.php
Результат поиска
Search results follow the same pattern as other template types:
search.php
index.php
404 (Не найдено)
Likewise, 404 template files are called in this order:
404.php
index.php
Прикрепление
Rendering an attachment page (attachment post-type) uses the following path:
{MIME-type}.php – can be any MIME type (For example: image.php, video.php, pdf.php). For text/plain, the following path is used (in order):
text-plain.php
plain.php
text.php
attachment.php
single-attachment-{slug}.php – For example, if the attachment slug is holiday, WordPress would look for single-attachment-holiday.php.
single-attachment.php
single.php
singular.php
index.php
Встроенное
The embed template file is used to render a post which is being embedded. Since 4.5, WordPress uses the following path:
embed-{post-type}-{post_format}.php – First, WordPress looks for a template for the specific post. For example, if its post type is post and it has the audio format, WordPress would look for embed-post-audio.php.
embed-{post-type}.php – If the post type is product, WordPress would look for embed-product.php.
embed.php – WordPress then falls back to embed.php.
Finally, WordPress ultimately falls back to its own wp-includes/theme-compat/embed.php template.
Since WordPress 4.7, any dynamic part of a template name which includes non-ASCII characters in its name actually supports both the un-encoded and the encoded form, in that order. You can choose which to use.
Here’s the page template hierarchy for a page named “Hello World ?” with an ID of 6:
page-hello-world-?.php
page-hello-world-%f0%9f%98%80.php
page-6.php
page.php
singular.php
The same behaviour applies to post slugs, term names, and author nicenames.
The WordPress template system lets you filter the hierarchy. This means that you can insert and change things at specific points of the hierarchy. The filter (located in the get_query_template() function) uses this filter name: "{$type}_template" where $type is the template type.
Here is a list of all available filters in the template hierarchy:
For example, let’s take the default author hierarchy:
author-{nicename}.php
author-{id}.php
author.php
To add author-{role}.php before author.php, we can manipulate the actual hierarchy using the ‘author_template’ template type. This allows a request for /author/username where username has the role of editor to display using author-editor.php if present in the current themes directory.
Template tags are used within themes to retrieve content from your database. The content could be anything from a blog title to a complete sidebar. Template tags are the preferred method to pull content into your theme because:
they can print dynamic content;
they can be used in multiple theme files; and
they separate the theme into smaller, more understandable, sections.
A template tag is simply a piece of code that tells WordPress to get something from the database. It is broken up into three components:
A PHP code tag
A WordPress function
Optional parameters
You can use a template tag to call another theme file or some information from the database.
For example, the template tag get_header() tells WordPress to get the header.php file and include it in the current theme file. Similarly, get_footer() tells WordPress to get the footer.php file.
There are also other kinds of template tags:
the_title() – tells WordPress to get the title of the page or post from the database and include it.
bloginfo( 'name' ) – tells WordPress to get the blog title out of the database and include it in the template file.
If you look closely at the last example, you will also see that there is a parameter between the parenthesis. Parameters let you do two things:
By encapsulating all of the code for a particular chunk of content, template tags make it very easy to include various pieces of a template in a theme file and also to maintain the theme.
It is far easier to create one header.php file and have all of your theme templates like single.php, page.php, front-page.php, etc. reference that one theme file using get_header() than copying and pasting the code into each theme file. It also makes maintenance easier. Whenever you make a change in your header.php file, the change is automatically carried over into all of your other theme files.
Another reason to use template tags is to display dynamic data, i.e. data from the database. In your header, you could manually include the title tag, like so:
1
<title>My Personal Website</title>
However, doing this means manually editing your theme any time you want to change the title of your website. Instead, it’s easier to include the bloginfo( 'name' ) template tag, which automatically fetch the site title from the database. Now, you can change the title of your site in WordPress, rather than having to hard code your theme templates.
Using template tags is very simple. In any template file you can use a template tag by simply printing one line of php code to call the template tag. Printing the header.php file is as simple as:
Some template tags let you pass parameters. Parameters are extra pieces of information that determine what is retrieved from the database.
For example, the bloginfo() template tag allows you to give it a parameter telling WordPress the specific piece of information you want. To print the blog name, you just pass along the parameter “name,” like so:
1
bloginfo( 'name');
To print the version of WordPress that the blog is running on, you would pass a parameter of “version”:
1
bloginfo( 'version');
For each template tag, the parameters differ. A list of the parameters and what they can do can be found on specific template tag pages located throughout the code reference.
Many template tags work within the WordPress Loop. This means that they are included in the template files as part of the php “loop” that generates the pages users see based upon the instructions inside of the loop.
The WordPress loop begins with:
1
2
3
if( have_posts() ) :
while( have_posts() ) :
the_post();
Template tags that work within the loop must be in the middle area, before the ending section of the loop below:
1
2
3
4
endwhile;
else:
_e( 'Sorry, no posts matched your criteria.', 'devhub');
endif;
Some of template tags that need to be inside of the loop include
The Loop is the default mechanism WordPress uses for outputting posts through a theme’s template files. How many posts are retrieved is determined by the number of posts to show per page defined in the Reading settings. Within the Loop, WordPress retrieves each post to be displayed on the current page and formats it according to your theme’s instructions.
The Loop extracts the data for each post from the WordPress database and inserts the appropriate information in place of each template tag. Any HTML or PHP code in The Loop will be processed for each post.
To put it simply, the Loop is true to its name: it loops through each post retrieved for the current page one at a time and performs the action specified in your theme.
You can use the Loop for a number of different things, for example to:
display post titles and excerpts on your blog’s homepage;
display the content and comments on a single post;
display the content on an individual page using template tags; and
This loop says that when there are posts, loop through and display the posts. Broken down into more detail:
The have_posts() function checks whether there are any posts.
If there are posts, a while loop continues to execute as long as the condition in the parenthesis is logically true. As long as have_posts() continues to be true, the loop will continue.
The Loop should be placed in index.php, and in any other templates which are used to display post information. Because you do not want to duplicate your header over and over, the loop should always be placed after the call to get_header(). For example:
1
2
3
4
5
6
7
8
<?php
get_header();
if( have_posts() ) :
while( have_posts() ) : the_post();
// Display post content
endwhile;
endif;
?>
In the above example, the end of the Loop is shown with an endwhile and endif. The Loop must always begin with the same if and while statements, as mentioned above and must end with the same end statements.
Any template tags that you wish to apply to all posts must exist between the beginning and ending statements.
Tip: You can include a custom 404 “not found” message that will be displayed if no posts matching the specified criteria are available. The message must be placed between the endwhile and endif statements, as seen in examples below.
An extremely simple index.php file would look like:
1
2
3
4
5
6
7
8
9
10
11
12
13
14
<?php
get_header();
if( have_posts() ) :
while( have_posts() ) : the_post();
the_content();
endwhile;
else:
_e( 'Sorry, no posts matched your criteria.', 'textdomain');
the_excerpt() – the first 55 words of a post’s main content followed by an ellipsis (…) or read more link that goes to the full post. You may also use the “Excerpt” field of a post to customize the length of a particular excerpt.
Most blogs have a blog archive page, which can show a number of things including the post title, thumbnail, and excerpt. The example below shows a simple loop that checks to see if there are any posts and, if there are, outputs each post’s title, thumbnail, and excerpt. If no posts exists, it displays the message in parentheses.
1
2
3
4
5
6
7
8
9
10
11
<?php
if( have_posts() ) :
while( have_posts() ) : the_post();
the_title( '<h2>', '</h2>');
the_post_thumbnail();
the_excerpt();
endwhile;
else:
_e( 'Sorry, no posts matched your criteria.', 'textdomain');
In WordPress, each post has its own page, which displays the relevant information for that post. Template tags allow you to customize which information you want to display.
In the example below, the loop outputs the post’s title and content. You could use this example in a post or page template file to display the most basic information about the post. You could also customize this template to add more data to the post, for example the category.
1
2
3
4
5
6
7
8
9
10
<?php
if( have_posts() ) :
while( have_posts() ) : the_post();
the_title( '<h1>', '</h1>');
the_content();
endwhile;
else:
_e( 'Sorry, no pages matched your criteria.', 'textdomain');
In some situations, you may need to use more than one loop. For example you may want to display the titles of the posts in a table of content list at the top of the page and then display the content further down the page. Since the query isn’t being changed we simply need to rewind the loop when we need to loop through the posts for a second time. For that we will use the function rewind_posts().
You can use rewind_posts() to loop through the same query a second time. This is useful if you want to display the same query twice in different locations on a page.
Here is an example of rewind_posts() in use:
1
2
3
4
5
6
7
8
9
10
11
12
13
14
15
16
<?php
// Start the main loop
if( have_posts() ) :
while( have_posts() ) : the_post();
the_title();
endwhile;
endif;
// Use rewind_posts() to use the query a second time.
Using two loops with the same query was relatively easy but not always what you will need. Instead, you will often want to create a secondary query to display different content on the template. For example, you might want to display two groups of posts on the same page, but do different things to each group. A common example of this, as shown below, is displaying a single post with a list of posts from the same category below the single post.
1
2
3
4
5
6
7
8
9
10
11
12
13
14
15
16
17
18
19
20
21
22
23
24
25
26
27
28
29
<?php
// The main query.
if( have_posts() ) :
while( have_posts() ) : the_post();
the_title();
the_content();
endwhile;
else:
// When no posts are found, output this text.
_e( 'Sorry, no posts matched your criteria.');
endif;
wp_reset_postdata();
/*
* The secondary query. Note that you can use any category name here. In our example,
As you can see in the example above, we first display a regular loop. Then we define a new variable that uses WP_Query to query a specific category; in our case, we chose the example-category slug.
Note that the regular loop in the example above has one difference: it calls wp_reset_postdata() to reset the post data. Before you can use a second loop, you need to reset the post data. There are two ways to do this:
It’s important when using multiple loops in a template that you reset them. Not doing so can lead to unexpected results due to how data is stored and used within the global $post variable. There are three main ways to reset the loop depending on the way they are called.
Use wp_reset_postdata() when you are running custom or multiple loops with WP_Query. This function restores the global $post variable to the current post in the main query. If you’re following best practices, this is the most common function you will use to reset loops.
To properly use this function, place the following code after any loops with WP_Query:
1
<?php wp_reset_postdata(); ?>
Here is an example of a loop using WP_Query that is reset with wp_reset_postdata().
1
2
3
4
5
6
7
8
9
10
11
12
13
14
15
16
17
18
19
20
21
<?php
// Example argument that defines three posts per page.
Using wp_reset_query() restores the WP_Query and global $post data to the original main query. You MUST use this function to reset your loop if you use query_posts() within your loop. You can use it after custom loops with WP_Query because it actually calls wp_reset_postdata() when it runs. However, it’s best practice to use wp_reset_postdata() with any custom loops involving WP_Query.
Alert:query_posts() is not best practice and should be avoided if at all possible. Therefore, you shouldn’t have much use for wp_reset_query().
To properly use this function, place the following code after any loops with query_posts().
The functions.php file is where you add unique features to your WordPress theme. It can be used to hook into the core functions of WordPress to make your theme more modular, extensible, and functional.
The functions.php file behaves like a WordPress plugin, adding features and functionality to a WordPress site. You can use it to call WordPress functions and to define your own functions.
Note: The same result can be produced using either a plugin or functions.php. If you are creating new features that should be available no matter what the website looks like, it is best practice to put them in a plugin.
There are advantages and tradeoffs to either using a WordPress plugin or using functions.php.
A WordPress plugin:
requires specific, unique header text;
is stored in wp-content/plugins, usually in a subdirectory;
only executes on page load when activated;
applies to all themes; and
should have a single purpose – for example, offer search engine optimization features or help with backups.
Meanwhile, a functions.php file:
requires no unique header text;
is stored in theme’s subdirectory in wp-content/themes;
executes only when in the active theme’s directory;
applies only to that theme (if the theme is changed, the features can no longer be used); and
can have numerous blocks of code used for many different purposes.
Each theme has its own functions file, but only code in the active theme’s functions.php is actually run. If your theme already has a functions file, you can add code to it. If not, you can create a plain-text file named functions.php to add to your theme’s directory, as explained below.
A child theme can have its own functions.php file. Adding a function to the child functions file is a risk-free way to modify a parent theme. That way, when the parent theme is updated, you don’t have to worry about your newly added function disappearing.
Note: Although the child theme’s functions.php is loaded by WordPress right before the parent theme’s functions.php, it does not override it. The child theme’s functions.php can be used to augment or replace the parent theme’s functions. Similarly, functions.php is loaded after any plugin files have loaded.
With functions.php you can:
Use WordPress hooks. For example, with the excerpt_length filter you can change your post excerpt length (from default of 55 words).
Enable WordPress features with add_theme_support(). For example, turn on post thumbnails, post formats, and navigation menus.
Define functions you wish to reuse in multiple theme template files.
Warning: If a WordPress plugin calls the same function, or filter, as you do in your functions.php, the results can be unexpected, even causing your site to be disabled.
Below are a number of examples that you can use in your functions.php file to support various features. Each of these examples are allowed in your theme if you choose to submit it to the WordPress.org theme directory.
A number of theme features should be included within a “setup” function that runs initially when your theme is activated. As shown below, each of these features can be added to your functions.php file to activate recommended WordPress features.
Note: It’s important to namespace your functions with your theme name. All examples below use myfirsttheme_ as their namespace, which should be customized based on your theme name.
To create this initial function, start a new function entitled myfirsttheme_setup(), like so:
1
2
3
4
5
6
7
8
9
10
if( ! function_exists( 'myfirsttheme_setup') ) :
/**
* Sets up theme defaults and registers support for various WordPress features
*
* It is important to set up these functions before the init hook so that none of these
* features are lost.
*
* @since MyFirstTheme 1.0
*/
functionmyfirsttheme_setup() {
Note: In the above example, the function myfirsttheme_setup is started but not closed out. Be sure to close out your functions
Automatic feed links enables post and comment RSS feeds by default. These feeds will be displayed in <head> automatically. They can be called using add_theme_support().
Custom navigation menus allow users to edit and customize menus in the Menus admin panel, giving users a drag-and-drop interface to edit the various menus in their theme.
You can set up multiple menus in functions.php. They can be added using register_nav_menus() and inserted into a theme using wp_nav_menu(), as discussed later in this handbook. If your theme will allow more than one menu, you should use an array. While some themes will not have custom navigation menus, it is recommended that you allow this feature for easy customization.
Themes can be translated into multiple languages by making the strings in your theme available for translation. To do so, you must use load_theme_textdomain(). For more information on making your theme available for translation, read the internationalization section.
Post thumbnails and featured images allow your users to choose an image to represent their post. Your theme can decide how to display them, depending on its design. For example, you may choose to display a post thumbnail with each post in an archive view. Or, you may want to use a large featured image on your homepage. While not every theme needs featured images, it’s recommended that you support post thumbnails and featured images.
Post formats allow users to format their posts in different ways. This is useful for allowing bloggers to choose different formats and templates based on the content of the post. add_theme_support() is also used for Post Formats. This is recommended.
A content width is added to your functions.php file to ensure that no content or assets break the container of the site. The content width sets the maximum allowed width for any content added to your site, including uploaded images. In the example below, the content area has a maximum width of 800 pixels. No content will be larger than that.
There are other common features you can include in functions.php. Listed below are some of the most common features. Click through and learn more about each of these features.
If you choose to include all of the functions listed above, this is what your functions.php might look like. It has been commented with references to above.
1
2
3
4
5
6
7
8
9
10
11
12
13
14
15
16
17
18
19
20
21
22
23
24
25
26
27
28
29
30
31
32
33
34
35
36
37
38
39
40
41
42
43
44
45
46
47
48
49
50
51
52
53
54
55
56
/**
* MyFirstTheme's functions and definitions
*
* @package MyFirstTheme
* @since MyFirstTheme 1.0
*/
/**
* First, let's set the maximum content width based on the theme's design and stylesheet.
* This will limit the width of all uploaded images and embeds.
*/
if( ! isset( $content_width) )
$content_width= 800; /* pixels */
if( ! function_exists( 'myfirsttheme_setup') ) :
/**
* Sets up theme defaults and registers support for various WordPress features.
*
* Note that this function is hooked into the after_setup_theme hook, which runs
* before the init hook. The init hook is too late for some features, such as indicating
* support post thumbnails.
*/
functionmyfirsttheme_setup() {
/**
* Make theme available for translation.
* Translations can be placed in the /languages/ directory.
As you’ve learned, WordPress themes are built from a number of different template files. At the very least this will usually include a sidebar.php, header.php and footer.php. These are called using Template Tags, for example:
You can create custom versions of these files can be called as well by naming the file sidebar-{your_custom_template}.php, header-{your_custom_template}.php and footer-{your_custom_template}.php. You can then use Template Tags with the custom template name as the only parameter, like this:
1
2
3
get_header( 'your_custom_template');
get_footer( 'your_custom_template');
get_sidebar( 'your_custom_template');
WordPress creates pages by assembling various files. Aside from the standard files for the header, footer and sidebar, you can create custom template files and call them at any location in the page using get_template_part(). To create a custom template file in your theme give the file an appropriate name and use the same custom template system as with the header, sidebar and footer files:
1
slug-template.php
For example, if you would like to create a custom template to handle your post content you could create a template file called content.php and then add a specific content layout for product content by extending the file name to content-product.php. You would then load this template file in your theme like this:
1
get_template_part( 'content', 'product');
If you want to add more organization to your templates, you can place them in their own directories within your theme directory. For example, suppose you add a couple more content templates for profiles and locations, and group them in their own directory called content-templates.
The theme hierarchy for your theme called my-theme might look like the following. style.css and page.php are included for context.
themes
my-theme
content-templates
content-location.php
content-product.php
content-profile.php
style.css
To include your content templates, prepend the directory names to the slug argument like this:
If you are not using a child theme, this function will return the full URI to your theme’s main folder. You can use this to reference sub-folders and files in your theme like this:
1
echoget_theme_file_uri( 'images/logo.png');
If you are using a child theme then this function will return the URI of the file in your child theme if it exists. If the file cannot be found in your child theme, the function will return the URI of the file in the parent theme. This is particularly important to keep in mind when distributing a theme or in any other case where a child theme may or may not be active.
To access the path to a file in your theme’s directories, you can use the following function:
Like get_theme_file_uri(), this will access the path of the file in the child theme if it exists. If the file cannot be found in the child theme, the function will access the path to the file in the parent theme.
In a child theme, you can link to a file URI or path in the parent theme’s directories using the following functions:
Take care when referencing files that may not be present, as these functions will return the URI or file path whether the file exists or not. If the file is missing, these functions will return a broken link.
Take note that the newer 4.7 functions run the older functions anyway as part of the checking process so it makes sense to use the newer functions when possible.
Regardless of your permalink settings, you can link to a page or post dynamically by referring to its unique numerical ID (seen in several pages in the admin interface) with
1
<a href="<?php echo get_permalink($ID); ?>">This is a link</a>
This is a convenient way to create page menus as you can later change page slugs without breaking links, as IDs will stay the same. However, this might increase database queries.
When you’re creating your theme, you may want to create additional stylesheets or JavaScript files. However, remember that a WordPress website will not just have your theme active, it will also be using many different plugins. So that everything works harmoniously, it’s important that theme and plugins load scripts and stylesheets using the standard WordPress method. This will ensure the site remains efficient and that there are no incompatibility issues.
Adding scripts and styles to WordPress is a fairly simple process. Essentially, you will create a function that will enqueue all of your scripts and styles. When enqueuing a script or stylesheet, WordPress creates a handle and path to find your file and any dependencies it may have (like jQuery) and then you will use a hook that will insert your scripts and stylesheets.
The proper way to add scripts and styles to your theme is to enqueue them in the functions.php files. The style.css file is required in all themes, but it may be necessary to add other files to extend the functionality of your theme.
Tip: WordPress includes a number of JavaScript files as part of the software package, including commonly used libraries such as jQuery. Before adding your own JavaScript, check to see if you can make use of an included library.
The basics are:
Enqueue the script or style using wp_enqueue_script() or wp_enqueue_style()
Your CSS stylesheets are used to customize the presentation of your theme. A stylesheet is also the file where information about your theme is stored. For this reason, the style.css file is required in every theme.
Rather then loading the stylesheet in your header.php file, you should load it in using wp_enqueue_style. In order to load your main stylesheet, you can enqueue it in functions.php
$src is where it is located. The rest of the parameters are optional.
$deps refers to whether or not this stylesheet is dependent on another stylesheet. If this is set, this stylesheet will not be loaded unless its dependent stylesheet is loaded first.
$ver sets the version number.
$media can specify which type of media to load this stylesheet in, such as ‘all’, ‘screen’, ‘print’ or ‘handheld.’
So if you wanted to load a stylesheet named “slider.css” in a folder named “CSS” in you theme’s root directory, you would use:
Any additional JavaScript files required by a theme should be loaded using wp_enqueue_script. This ensures proper loading and caching, and allows the use conditional tags to target specific pages. These are optional.
wp_enqueue_script uses a similar syntax to wp_enqueue_style.
$deps is an array that can handle any script that your new script depends on, such as jQuery.
$ver lets you list a version number.
$in_footer is a boolean parameter (true/false) that allows you to place your scripts in the footer of your HTML document rather then in the header, so that it does not delay the loading of the DOM tree.
WordPress comments have quite a bit of functionality in them right out of the box, including threaded comments and enhanced comment forms. In order for comments to work properly, they require some JavaScript. However, since there are certain options that need to be defined within this JavaScript, the comment-reply script should be added to every theme that uses comments.
The proper way to include comment reply is to use conditional tags to check if certain conditions exist, so that the script isn’t being loaded unnecessarily. For instance, you can only load scripts on single post pages using is_singular, and check to make sure that “Enable threaded comments” is selected by the user. So you can set up a function like:
It is best to combine all enqueued scripts and styles into a single function, and then call them using the wp_enqueue_scripts action. This function and action should be located somewhere below the initial setup (performed above).
By default, WordPress includes many popular scripts commonly used by web developers, as well as the scripts used by WordPress itself. Some of them are listed in the table below:
Conditional Tags can be used in your Template Files to alter the display of content depending on the conditions that the current page matches. They tell WordPress what code to display under specific conditions. Conditional Tags usually work with PHP if /else Conditional Statements.
The code begins by checking to see if a statement is true or false. If the statement is found to be true, the first set of code is executed. If it’s false, the first set of code is skipped, and the second set of code (after the else) is executed instead.
For example, you could ask if a user is logged in, and then provide a different greeting depending on the result.
For a Conditional Tag to modify your data, the information must already have been retrieved from your database, i.e. the query must have already run. If you use a Conditional Tag before there is data, there’ll be nothing to ask the if/else statement about.
It’s important to note that WordPress loads functions.php before the query is run, so if you simply include a Conditional Tag in that file, it won’t work.
Listed below are the conditions under which each of the following conditional statements proves to be true. Tags which can accept parameters are noted.
This condition returns true when the main blog page is being displayed, usually in standard reverse chronological order. If your home page has been set to a Static Page instead, then this will only prove true on the page which you set as the “Posts page” in Settings > Reading.
Returns true when any single Post (or attachment, or custom Post Type) is being displayed. This condition returns false if you are on a page.
is_single( ’17’ )
is_single() can also check for certain posts by ID and other parameters. The above example proves true when Post 17 is being displayed as a single Post.
is_single( ‘Irish Stew’ )
Parameters include Post titles, as well. In this case, it proves true when the Post with title “Irish Stew” is being displayed as a single Post.
is_single( ‘beef-stew’ )
Proves true when the Post with Post Slug “beef-stew” is being displayed as a single Post.
Returns true when the single post being displayed is either the post_title is “Beef Stew”, post_title is “Pea Soup” or post_title is “Chilli”.
Note: This function does not distinguish between the post ID, post title, or post name. A post named “17” would be displayed if a post ID of 17 was requested. Presumably the same holds for a post with the slug “17”.
Returns true if the “Stick this post to the front page” check box has been checked for the current post. In this example, no post ID argument is given, so the post ID for the Loop post is used.
is_sticky( ’17’ )
Returns true when Post 17 is considered a sticky post.
You can test to see if the current post is of a certain type by including get_post_type() in your conditional. It’s not really a conditional tag, but it returns the registered post type of the current post.
Returns true if a given post type is a registered post type. This does not test if a post is a certain post_type. Note: This function replaces a function called is_post_type which existed briefly in 3.0 development.
You can use this code to check whether you’re on the nth page in a Post or Page that has been divided into pages using the <!--nextpage--> QuickTag. This can be useful, for example, if you wish to display meta-data only on the first page of a post divided into several pages.
Example 1
1
2
3
4
5
6
<?php
$paged= $wp_query->get( 'page');
if( ! $paged|| $paged< 2 ) {
// This is not a paginated page (or it's simply the first page of a paginated page/post) } else {
There is no is_subpage() function, but you can test this with a little code:
Snippet 1
1
2
3
4
5
6
7
<?php global$post; // if outside the loop
if( is_page() && $post->post_parent ) {
// This is a subpage
} else{
// This is not a subpage
}
?>
You can create your own is_subpage() function using the code in Snippet 2. Add it to your functions.php file. It tests for a parent page in the same way as Snippet 1, but will return the ID of the page parent if there is one, or false if there isn’t.
Snippet 2
1
2
3
4
5
6
7
8
9
10
functionis_subpage() {
global$post; // load details about this page
if( is_page() && $post->post_parent ) { // test to see if the page has a parent
return$post->post_parent; // return the ID of the parent post
} else{ // there is no parent so ...
returnfalse; // ... the answer to the question is false
}
}
It is advisable to use a function like that in Snippet 2, rather than using the simple test like Snippet 1, if you plan to test for sub-pages frequently.
To test if the parent of a page is a specific page, for instance “About” (page id pid 2 by default), we can use the tests in Snippet 3. These tests check to see if we are looking at the page in question, as well as if we are looking at any child pages. This is useful for setting variables specific to different sections of a web site, so a different banner image, or a different heading.
$bannerimg= 'home.jpg'; // just in case we are at an unclassified page, perhaps the home page
}
?>
Snippet 4 is a function that allows you to carry out the tests above more easily. This function will return true if we are looking at the page in question (so “About”) or one of its sub pages (so a page with a parent with ID “2”).
Snippet 4
1
2
3
4
5
6
7
8
9
10
11
12
13
14
15
functionis_tree( $pid) { // $pid = The ID of the page we're looking for pages underneath
global$post; // load details about this page
if( is_page($pid) )
returntrue; // we're at the page or at a sub page
$anc= get_post_ancestors( $post->ID );
foreach( $ancas$ancestor) {
if( is_page() && $ancestor== $pid) {
returntrue;
}
}
returnfalse; // we aren't at the page, and the page is not an ancestor
Add Snippet 4 to your functions.php file, and call is_tree( ‘id’ ) to see if the current page is the page, or is a sub page of the page. In Snippet 3, is_tree( ‘2’ ) would replace “is_page( ‘about’ ) || ‘2’ == $post->post_parent” inside the first if tag.
Note that if you have more than one level of pages the parent page is the one directly above and not the one at the very top of the hierarchy.
Is Page Template ‘about’ being used? Note that unlike other conditionals, if you want to specify a particular Page Template, you need to use the filename, such as about.php or my_page_template.php.
Note: if the file is in a subdirectory you must include this as well. Meaning that this should be the filepath in relation to your theme as well as the filename, for example ‘page-templates/about.php’.
Check if the current post has any of given terms. The first parameter should be an empty string. It expects a taxonomy slug/name as a second parameter.
has_term( ‘green’, ‘color’ )
When the current post has the term ‘green’ from taxonomy ‘color’.
When an attachment document to a post or Page is being displayed. An attachment is an image or other file uploaded through the post editor’s upload utility. Attachments can be displayed on their own ‘page’ or template.
When the site requested is a Syndication. This tag is not typically used by users; it is used internally by WordPress and is available for Plugin Developers.
When the site requested is WordPress’ hook into its Trackback engine. This tag is not typically used by users; it is used internally by WordPress and is available for Plugin Developers.
Check to see if a given sidebar is active (in use). Returns true if the sidebar (identified by name, id, or number) is in use, otherwise the function returns false.
This example shows how to use is_single() to display something specific only when viewing a single post page:
1
2
3
4
5
if( is_single() ) {
echo'This is just one of many fabulous entries in the '. single_cat_title() . ' category!';
}
Another example of how to use Conditional Tags in the Loop. Choose to display content or excerpt in index.php when this is a display single post or the home page.
1
2
3
4
5
6
7
8
9
10
if( is_home() || is_single() ) {
the_content();
}
else{
the_excerpt();
}
When you need display a code or element, in a place that is NOT the home page.
The Creating an Error 404 Page article [NEED Link to this?] has an example of using the PHP conditional function isset() in the Writing Friendly Messages section.
At times queries performed in other templates such as sidebar.php may corrupt certain conditional tags. For instance, in header.php a conditional tag works properly but doesn’t work in a theme’s footer.php. The trick is to put wp_reset_query before the conditional test in the footer. For example:
Categories, tags, and taxonomies are all related and can be easily confused.
We’ll use the example of building a theme for a recipe website to help break down categories, tags, and taxonomies.
In our recipe website, the categories would be Breakfast, Lunch, Dinner, Appetizers, Soups, Salads, Sides, and Desserts. All recipes will fit within those categories, but users might want to search for something specific like chocolate desserts or ginger chicken dinners.
Chocolate, ginger, and chicken are all examples of tags. They are another level of specificity that provides meaning to the user.
Lastly, there are taxonomies. In reality, categories and tags are examples of default taxonomies which simply are a way to organize content. Taxonomies are the method of classifying content and data in WordPress. When you use a taxonomy you’re grouping similar things together. The taxonomy refers to the sum of those groups. As with Post Types, there are a number of default taxonomies, and you can also create your own.
Recipes are normally organized by category and tag, but there are some other helpful ways to break the recipes down to be more user friendly. For example, the recipe website might want an easy way to display recipes by cook time. A custom taxonomy of cook time with 0-30 min, 30-min to an hour, 1 to 2 hours, 2+ hours would be a great breakdown. Additionally, cook method such as grill, oven, stove, refrigerator, etc would be another example of a custom taxonomy that would be relevant for the site. There could also be a custom taxonomy for how spicy the recipe is and then a rating from 1-5 on spiciness.
Terms are items within your taxonomy. So, for example, if you have the Animal taxonomy you would have the terms, dogs, cats, and sheep. Terms can be created via the WordPress admin, or you can use the wp_insert_term() function.
WordPress offers several different hierarchies of templates for categories, tags, or custom taxonomies. More details on their structure and usage may be found on the Taxonomy Templates page.
It is possible to create new taxonomies in WordPress. You may, for example, want to create an author taxonomy on a book review website, or an actor taxonomy on a film site. As with custom post type it is recommended that you put this functionality in a plugin. This ensures that when the user changes their website’s design, their content is preserved in the plugin.
В данной статье подробно рассказывается о том как произвести установку WordPress на хостинг. Возможно, кому-то захочется или понадобится установить WordPress на свой компьютер с операционной системой Windows, так сказать локально. Это можно сделать с помощью Denwer и об этом будет рассказано в отдельной статье: установка WordPress на Denwer.
Разговор в этой статье пойдёт о плагинах с точки зрения пользователя WordPress. О разработке плагинов разговор отдельный, а в этой статье я дам информацию, которая может стать крайне полезной для тех, кто не так давно установил WordPress и ещё не понимает некоторых тонкостей.